 DriftEngine
Rendering
Text and overlays
A built-in pixel font for heads-up displays, panels and keycaps, a portrait in a box of its own, and distance-field text in the world.
npm install @driftengine/core
The engine draws text two ways. A 5×7 pixel font is built into the code from bitmasks, so a heads-up
display downloads nothing and carries nothing to license. Signed-distance-field text draws a font you
supply, crisp at any size, in the world. Menus, buttons and layout are the job of the
@driftengine/ui2d package, in the Input and interface section.
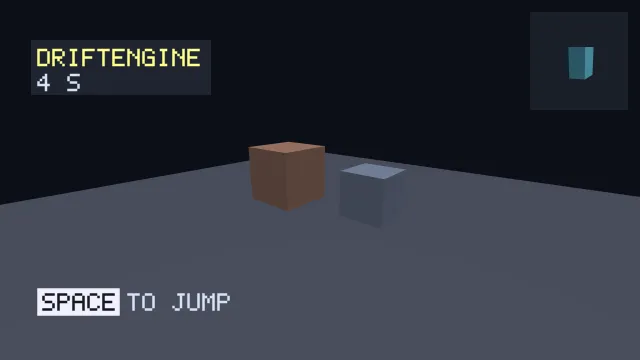
Starts examples/overlay-text in this page, on WebGPU where your browser has it.
The pixel font
/** One handle per message, laid out once and again only when its string changes. */
const title = renderer.createText();
const timer = renderer.createText();
const prompt = renderer.createText();
const keycap = renderer.createText();
renderer.setText(title, 'DRIFTENGINE');
renderer.setText(prompt, 'TO JUMP');
renderer.setText(timer, '0 S');
/** A solid plate of cells behind the key: SPACE is 29 cells wide, and two of margin all round. */
renderer.setPlate(keycap, 33, 11, -2);
const keyLabel = renderer.createText();
renderer.setText(keyLabel, 'SPACE');createText() makes a handle for one message. setText(handle, string) lays it out, and does
nothing when the string is the one already laid out, so calling it every frame with an unchanged
string is free; the example rebuilds the timer's string only when the second changes. Make one handle
per message slot and keep it.
/** Styles are rebuilt only when the screen's size changes the cell size, never per frame. */
let cell = 0;
let titleStyle: TextStyle = DEFAULT_TEXT_STYLE;
let bodyStyle: TextStyle = DEFAULT_TEXT_STYLE;
let plateStyle: TextStyle = DEFAULT_TEXT_STYLE;
let keyStyle: TextStyle = DEFAULT_TEXT_STYLE;
function restyle(size: number): void {
  cell = size;
  titleStyle = { ...DEFAULT_TEXT_STYLE, cellSize: size, color: [1, 0.85, 0.35], glow: 1 };
  bodyStyle = { ...DEFAULT_TEXT_STYLE, cellSize: size, color: [0.8, 0.84, 0.92] };
  plateStyle = { ...DEFAULT_TEXT_STYLE, cellSize: size, color: [0.9, 0.9, 0.95] };
  keyStyle = { ...plateStyle, color: [0.08, 0.09, 0.12] };
}A TextStyle sets cellSize, the pixels per cell of a glyph, the color, glow for text that reads
as lit, and alpha. The rest animates text in: reveal from 0 to 1 runs the arrival, spin and
punch tumble and pop each character as it lands, and bob keeps it moving gently while it idles.
Build styles when the screen size changes, not every frame.
Panels and text over the scene
/* A backing panel first, then the glyphs over it, in CSS pixels from the top left. */
const left = Math.round(width * 0.06);
const baseline = Math.round(height * 0.18);
renderer.fillPanel(
  { left: left - cell * 3, top: baseline - cell * 10, width: cell * 72, height: cell * 22 },
  [0.14, 0.16, 0.22],
  0.8,
);
renderer.drawText(title, width, height, left, baseline, titleStyle, seconds);
renderer.drawText(timer, width, height, left, baseline + cell * 10, bodyStyle, seconds);drawText(handle, width, height, x, baseline, style, time) draws in CSS pixels from the top left of
the viewport you pass, with baseline measured down from the top. fillPanel(rect, color, alpha)
fills a rectangle behind it. textWidth(handle, cellSize) measures a string for centring or
right-aligning.
/* A key drawn as a plate with its letters over it, then the words after it. */
const keyX = left;
const keyY = Math.round(height * 0.86);
renderer.drawText(keycap, width, height, keyX, keyY, plateStyle, seconds);
renderer.drawText(keyLabel, width, height, keyX + cell * 2, keyY, keyStyle, seconds);
renderer.drawText(prompt, width, height, keyX + cell * 36, keyY, bodyStyle, seconds);setPlate(handle, widthCells, heightCells, bottomCell) turns a handle into a solid rectangle of
cells, for a keycap or a backing plate; bottomCell is where it starts, in the same
baseline-relative cells the glyphs use. A row of block glyphs would come out striped and sized in
whole glyph widths. Draw the plate first and the word over it.
Overlays may be drawn before endFrame, as here, or after it, over the presented frame, on both
backends.
A portrait in a box
/* A box in the corner with its own camera and its own backdrop, drawn into the same frame. */
const box = { left: width - 220, top: 24, width: 196, height: 196 };
const aspect = renderer.beginInset(box, [0.1, 0.12, 0.16]);
gemNode.setRotationAxisAngle(0, 1, 0, seconds);
gemNode.updateWorld();
portrait.updateMatrices(aspect);
renderer.bindMeshPass(portrait, DAYLIGHT);
renderer.drawMesh(gem, gemNode.worldMatrix);
renderer.endInset();beginInset(rect, clear) draws into a rectangle of the canvas on its own terms: a character preview
on a menu, an item in an inventory slot, a minimap. It takes the rectangle in CSS pixels, returns its
aspect ratio for the camera that fills it, and clears only inside it, so the frame around survives.
Bind a pass, draw, and endInset(). A clear of null clears only depth, for an object drawn into
the live frame instead of onto a backdrop.
A view model
/** The world first, then the view model over it, through the same camera. */
export function drawWithViewModel(
  renderer: RendererApi,
  camera: Camera,
  env: Environment,
  world: () => void,
  weapon: MeshHandle,
  weaponModel: Float32Array,
): void {
  renderer.bindMeshPass(camera, env);
  world();
  renderer.beginViewModel();
  renderer.drawMesh(weapon, weaponModel);
  renderer.endViewModel();
}beginViewModel(share) draws what follows in the nearest share of the depth range, 1% by default,
until endViewModel(): a first person's arms and weapon land in front of anything past the near
plane, so they never go into the wall they are pushed against. The world's depth is kept, so ambient
occlusion, depth of field and fog still see the world behind the weapon. Draw the view model with
the frame's camera, or bind one with its own field of view first. Its pixels take no motion of their
own under temporal reconstruction, so draw a view model with multisampling, and not inside an inset,
which has a depth of its own. endFrame closes one left open.
Text in the world
/** Load a font's metrics and atlas, which the engine never fetches itself, and lay a sign out. */
export async function shopSign(renderer: RendererApi, base: string): Promise<SdfTextHandle> {
  const font = parseSdfFont(await (await fetch(`${base}/metrics.json`)).json());
  const image = await createImageBitmap(await (await fetch(`${base}/atlas.png`)).blob());
  const atlas = renderer.createSurfaceTexture(image);
  const sign = renderer.createSdfText();
  renderer.setSdfText(sign, font, atlas, 'OPEN LATE', {
    ...DEFAULT_SDF_TEXT_STYLE,
    size: 0.4,
    anchorX: 'center',
  });
  return sign;
}

const NEON: Vec3 = [1, 0.4, 0.7];

/** Drawn inside the mesh pass, at a model matrix, like any mesh. */
export function drawSign(renderer: RendererApi, sign: SdfTextHandle, model: Float32Array): void {
  renderer.drawSdfText(sign, model, NEON, 1);
}Signed-distance-field text is opt-in, and the engine fetches nothing for it: you parse the font's
metrics with parseSdfFont and upload its atlas with createSurfaceTexture, both from files you
ship. setSdfText(handle, font, atlas, string, style) lays a string out, with a size in metres per
em, horizontal and vertical anchors, letter spacing and line height. drawSdfText(handle, model, color, opacity) draws it inside the mesh pass at a model matrix, with the frame's camera, so a sign
on a wall or a name over a character is part of the scene. It stays sharp close up, where the pixel
font would show its cells.
The engine repository's npm run sdf-font makes a font's atlas and metrics from a TTF or OTF file,
and can bake pre-shaped runs of a script that joins or reorders its letters, since the engine itself
does no shaping. Whoever runs it is responsible for that font's licence.